-
Letters: UK banks are failing customers who live in France
Connexion readers share their experiences of delayed and cancelled cards
-
Letters: France's confusing postcode system is the bane of our lives
Connexion reader uses parcel drop-off points to receive and take parcel deliveries
-
Comment: Brexit 'reset' cannot repair the damage it did to people with links to France
Columnist Nick Inman urges Brexit advocates to own their past promises and address the consequences of their actions
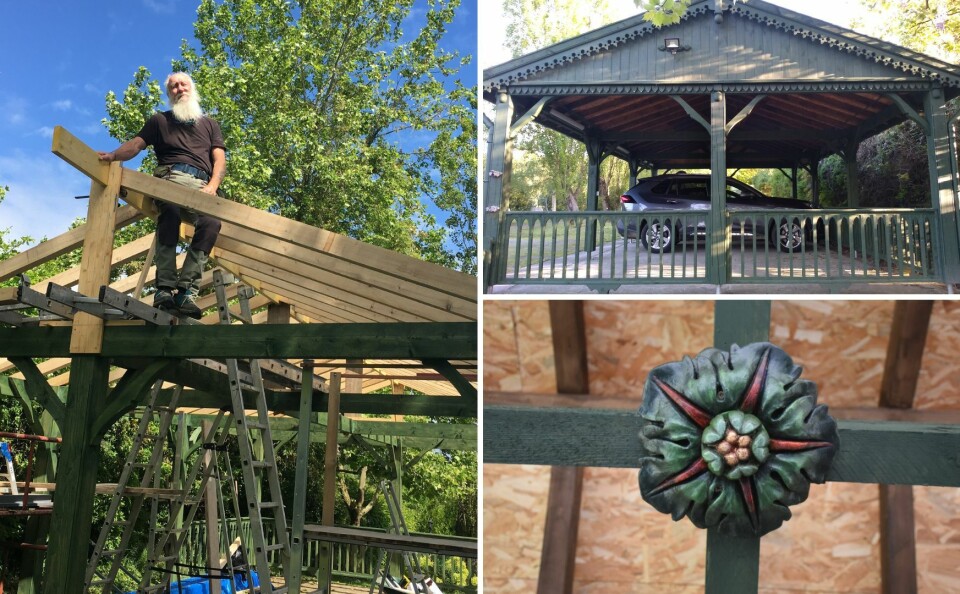
DIY car port adds beauty to retired builder’s French home
We follow how a car port project went from planning permission refusal to beautifully finished labour of love

One of the advantages of DIY is that you can, if you want, make a structure beautiful as well as functional.
Ornamentation is time-consuming and even if you are prepared to pay a professional for work that is not strictly necessary, there is no guarantee you will get what you want.
Better to let rip your own creativity.
This was the thinking of my friend David Bowden, who was a builder before moving to France.
He took advantage of the first lockdown to stop thinking about making a car port and actually do it – which put him one ahead of me.
He wanted it to be more than a shelter for his car: the intention was for it to look good as well.
Right to refuse first planning application
The first step was getting planning permission, for which he did a detailed technical drawing (a skill learned at school that now came in handy) that was submitted to the town hall and the departmental authorities.
His first application was rejected because it had a flat roof – not in keeping with the local architectural style.
So he modified the design to have a pitched roof.
This would take more work and be more expensive, but looking at the finished article, it is certain, and David agrees with me, that the planners got it right.
Concrete already laid
He was fortunate in having a concrete slab laid by a previous owner of his house that would form the base of the car port, eliminating a Herculean labour.
The remainder of the task was essentially to build a wooden superstructure.
Solid timber structure
David went to his local building supplies with a list of timber he would require – chiefly a set of stout 150mm square pillars, cut to equal height, and 5m-lengths of rafter to hold up the roof.
The trickiest part, he told me, was getting the metal sockets to hold the pillars in just the right place before fixing them securely in the concrete.
These were connected by a ring beam of rafters on top, running all the way around the car port.
Pitch perfect
Then the pitched roof could be assembled: an angled frame, large sheets of OSB (oriented strand board) and, as a final layer, tiles on the top.
Decorative touches
That was the structure done. Now for the decoration: fascia boards, an ornate handrail, art-nouveau brackets, and ceiling bosses such as you would normally see in a church.
David has the soul of an artist and, just as importantly, a decent woodworking machine and the necessary skill to turn out a well finished product.
Finally, electric cables had to be fitted so there could be light in the car port. These were hidden in plastic sheaths.
Paint bought in UK
Everything in place, the last job was a coat of paint.
For this, David used the charmingly named Cuprinol Ducksback (wax-based and conveniently water-thinned) in a rich shade of forest green, which he had brought over from the UK because it is difficult to find in France.
Labour of love
The whole job took almost a year because he did nearly every part of it by himself.
There are certainly quicker ways to put a roof over a car but I have never seen a car port that is such a joy to stand in and contemplate the workmanship.
It is almost a shame to park in it but that is what I do every Tuesday evening when David holds meditation sessions, which help frantic people like me to calm down.
Related articles
DIY: Check the price of cement in France and bag a better deal
French DIY: My mission to build a cost-effective garden pergola
French farmhouse renovation: How to bring to life redundant spaces


